Sunday, 7 February 2016

Valentine's Nail Art Ideas!

With Valentines right around the corner I thought it would be fitting to give you guys some ideas for Valentines themed nail art :-) 

Each of these creations are my own, if you'd like to see more then look up #lorasnails on Instagram :-) 

I'd like to apologise in advance for the crappy lighting and quality in some of these pics, they were taken with an iPhone 3 a couple years back :-P

Loved Up Owls

I also have a little pictorial for these too ;-)


Black & Roses


Simple White Love 


Purple Polka Dot & Roses
These roses are actually so easy to do, just add a blob of pink/red polish and add some messy black lines and outlines :-) 

Sequin Hearts


Ombre Heart

Also with a little pictorial ;-) 


Chocolate Strawberries


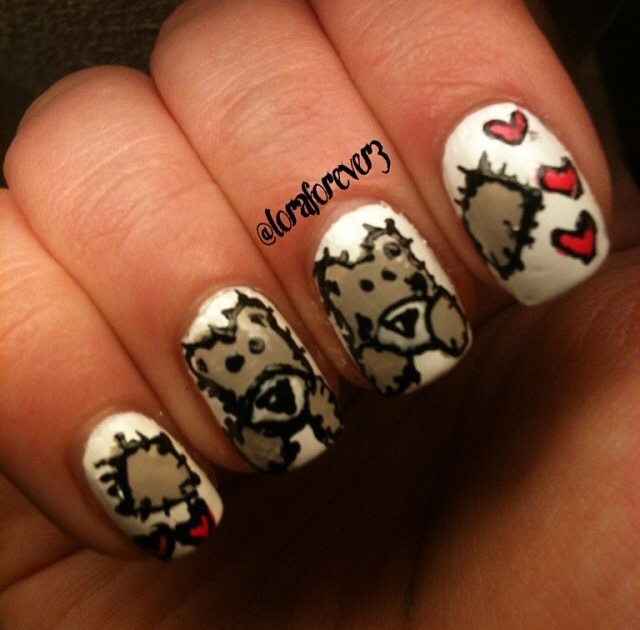
'Me-To-You' Bear 

This pictorial isn't mine but this is what I used to recreate this look :-) 


Heart Gems
I stuck tear drop shape gems into the shape of hearts :-) 


LOVE


White & Red Roses


Tattoo Love
I used a 'Nail Craze' stamp for this one :-) 

Here is the rose coloured in :-)


Black & Heart Accent Nail


I hope you guys enjoyed this little Valentines Nail Art Gallery! 

If you are inspired by my nails and recreate your own then definitely tag me on Twitter or Instagram, I'd love to see your Valentines Nail Art :-) 

Love & Hugs, Lora xo
Read More »

Monday, 1 February 2016

Makeup Monday: My Gerard Cosmetics Lipstick Collection

So I own 4 of the Gerard Cosmetics Lipsticks, I love the colours and the formula and the packaging is just stunning! I mean gold bullets, like really? They sure know how to make a gal feel special :-P 


There are some really good discount codes going around for the Gerard Cosmetics site so I have never paid the full price. I used Manny MUA's codes for these bad boys. You can search around for some decent codes though and see what you can find :-) 

I have a review already for 2 of the products, the lipstick in 'Vintage Rose' and the liquid lipstick in 'Serenity', you can read that full review a couple posts back :-) 


So let's get into my small but growing collection! 

1️⃣ Underground
This one is a really cool grey toned matte lippy. It's quite moisturising but I find it really shows all the lines and dryness on my lips! 


2️⃣ 1995
This one is from the Jaclyn Hill colab. It's a deep plum 90's kinda shade. It has a nice matte finish but it's very moisturising on the lips. 


3️⃣ Buttercup
This is also a Jaclyn Hill colab colour. It's a cream sheen kind of cool nude colour. It's very moisturising but I find that it accentuates any dryness on the lips! 


4️⃣ Vintage Rose
This literally a vintage rose pink colour! It's a matte shade but it can be quite drying. This is still my favourite out of the bunch though! 

It can be hard to first apply it so you really have to push hard on the lips to get the colour payoff! But when it's on its on for hours ;-) 


Here are all 4 lipsticks swatched side by side :-)


So guys, I hope you enjoyed this little insight into my Gerard Cosmetics Lipstick collection. What are your favourites? Let me know in the comments below :-) 

Love & Hugs, Lora xo 
Read More »

Sunday, 24 January 2016

Skincare Sunday: Garnier Micellar Water

So the world has gone Micellar mad, but is it really worth the hype? I put it to the test this month so that I could give you all a good old review :-) 


I got this mini size in boots for under €3, they also have them in Penneys for nice and cheap too :-) 

There are loads of different types of Micellar waters on the market these days, I've tried the Boots Botanics range one and I wasn't too impressed with that one so I wasn't expecting much from the Garnier Micellar Water :-P 

The Product
So it looks like water, and has zero scent at all, but if you shake it up it does bubble up a little :-) 


The main ingredient is water, but it also as a few chemicals in it like Hexylene Glycol and Glycerin.
It does say it works on sensitive skin also so if you have sensitive skin it's worth giving it a shot!


Application
It also feels like water on the face which is the strange part! I use a cotton round to apply it to my face and the really best part is that it doesn't sting or irritate my sensitive eyes! 


Makeup Removal
It actually works guys... Like it really really works! It had no trouble getting my waterproof mascara off and my double layer of foundations and powders! 

It's quick and it doesn't require a lot of rubbing which is great for your skin! 

The only thing that I found this struggles to remove is my Inglot gel eyeliner and Benefit's They're Real eyeliner, it does take a bit of rubbing to get it off but it does eventually remove it! 

The Aftermath
It feels lovely on the skin, not drying or irritating at all. I would still recommend to follow up with your regular moisturisers though. 

Would I Recommend?
I would definitely recommend this to my guys and gals that are looking for a quick and simple way to remove your makeup. Since its gentle on the skin it's perfect for people with sensitive skin!

This Garnier Micellar Water also comes in a bottle with a green band for oily skin but I have combination/everything skin and it works just fine for me :-) 


Hope you guys enjoyed this little insight into the ever trending Garnier Micellar Water, if you would like me to try out and review any other skincare products then let me know in the comments below, I'd be happy to oblige! :-)

Love & Hugs, Lora xo 
Read More »

Thursday, 21 January 2016

Tanning Thursday: Sally Hansen Deep Glow & Medium Glow

I This weeks tan was all about that Sally glow :-P I got the medium glow and the deep glow to try out for you guys :-)

They are around €10 each so definitely won't break the bank :-) You get around 3-4 full body applications out of one bottle :-) 


Well guys and gals this post is going to be an extremely short one because this tan washed off completely after just 1 shower/1 hand wash/ 1 splash of water! 

Application
I apply this with a tanning mitt, I spray the tan onto the mitt and apply it in circular motions from there! This tan is a spray like tan so it's best to apply it by spraying it on the mitt first so that you get an even colour :-) 

Here is the Deep Glow when first applied compared to my natural pasty leg....
     This is in direct sunlight 

    And here it is in artificial light. Looks        much darker!

So it is a really nice tan color when first applied. It doesn't get any darker as it's an instant tan so this is perfect for last minute tans :-) 

Here is the Medium Glow beside the Deep Glow....
    This is also in natural light (sunlight)

Not much of a difference, the Deep Glow is just a slightly more warm toned shade compared to the Medium Glow. 

   As you can see there's hardly a difference in artificial light! 

They are both quite natural looking tans, I'm not quite sure what the 'Glow' part is, but it's not shimmery or glittery so that's great :-) 

Longevity 
After shower 1 both tans completely washed off. It washes off easily with soap and water just like it says on the bottle! 

It says it's water resistant on the bottle also though so there's a bit of a contradiction :-P 
It's also not water resistant in the slightest, if you get rained on your tan will drop off of you :-P 


Would I recommend? 
I would recommend this tan for a last minute colour for those random last minute nights out, let's face it we all have them :-P 

It's great instant tan but not good if your looking for something long lasting!

If your looking for something more long lasting then check out last weeks Tanning Thursday post ;-) 


Hope you guys are enjoying these Tanning Thursday's, let me know what tans you'd like to see in the near future :-) 

Love & Hugs, Lora xo
Read More »

Sunday, 17 January 2016

Skincare Sunday: Benefit B.right Collection Review

I I got the Benefit B.right starter kit for Christmas this year and I've been trying it out ever since :-P I have been using it for a month now and most of the stuff is pretty used up so I thought it would be the perfect time to review it for you guys :-)


First off, the kit costs €20 at the Benefit stand in Debenhams. It contains 6 skincare products and I will review each of them below ;-) 


Foamingly Clean Facial Wash
This is a foam cleanser (can you tell by the name?). It works really well at removing my makeup at the end of the day but if I have a full cake face on for a couple hours it's not great at breaking it all down! 

When I use it to wash my face though It literally leaves the face squeaky clean but I think that's because it leaves a tiny tiny slight oil residue on the skin, it's nothing too crazy though, it's quite a nice moisturising feeling :-) 

I will definitely be purchasing the the full size bottle of this :-)


Refined Finishing Facial Polish 
This is an exfoliating cleanser that contains tiny little microbeads that work really well at buffing away the dead skin on your face :-) 


The only problem that I have with this exfoliator is that the microbeads are non biodegradable and that kills me because I would totally repurchase the full size of this if the beads weren't so harmful for our sea life. 

On a lighter note, if any of you guys have tried any exfoliators that do contain biodegradable exfoliating beads then definitely let me know :-) 


Moisture Prep Toning Lotion
The toner is ok. I found it quite drying. 
It supposedly makes your makeup apply smoother after applying it but I never noticed any difference to my skin or my makeup when I did use this toner so I won't be purchasing the full size of this.


Moisture Prep Facial Cream
The first moisturiser that comes in this set is a nice light moisturiser. It's still really moisturising for a light moisturiser. I used this as a day moisturiser under my makeup for a while and I did like it. 

Although it was moisturising, it's more tailored for oily/combination skin so I won't be purchasing the full size product. I would definitely recommend it to my oily gals and guys though :-) 


Total Moisture Facial Cream
The 2nd moisturiser in this kit is more rich and thick and is much better for more dry skin, which I love :-) 

It works well as a day and night moisturiser and it still looks lovely underneath makeup :-)
A little really goes a long way with this moisturiser, you only need a small amount for your whole face and neck :-)

I would recommend this for my dry skin gals and guys ;-) I will definitely be purchasing the full size of this bad boy :-) 


It's Potent Eye Cream
I love the eye cream, it's quite thick and rich but it does a really good job at brightening my under eye area over time and keeping my eyes nice and moisturised. It's very cooling on the eyes so it's great for puffy morning eyes! 

I will be purchasing the full size of this, but the small sample size I got lasted me for weeks! You really only need a tiny dab under each eye, a little goes a long way :-) 


So that's my little review of the Benefit B.right Skincare Starter Kit! The full size products do get a little pricey so if you are considering purchasing any of the Benefit skincare range then this starter kit is a great way to test a couple of the products out for such an affordable price :-) 

Hope you guys enjoyed this review, let me know what your favourite skincare ranges are in the comments below :-)

Love & Hugs, Lora xo


Read More »

Thursday, 14 January 2016

Tanning Thursday: Rimmel Sun Shimmer Self Tan Mousse

As promised, here is the first instalment of Tanning Thursday!
This tan is the Rimmel Sun Shimmer Self Tan Mousse in Dark Matte, and is €6.50 in Penneys! 


If you missed my post on how I prep my skin for tan the you can read it a few posts back :-)

Application
It applies nice and smooth and even in colour. It's quite a natural looking golden tan. It's a mousse consistency and it has instant colour so you can see exactly where you're putting it :-)

Day 1
This is what it looked like when I first applied it versus my natural pale self....

It's quite light when first applied, but still very natural and healthy looking.


Day 2
This is what it looked like the next morning...

It definitely darkened up over night but it's nothing too crazy. I like it a lot ;-) it's still quite natural looking, it's not an orangey shade so I really like how it darkened up. 

So if your planning on wearing this tan on a night out then definitely put it on the night before for the best results :-) 


Day 3
This is it after the first shower.... 

It's back to a more lighter natural looking shade, not as light as the first application but still a gorgeous sun kissed shade all the same!


Day 4
By shower 2 it stayed the same shade everywhere on my body except my chest and legs, for some reason my chest and legs are so bad at holding a tan... Does anyone else have this problem? No? Just me? Ok :-P 

It's lightening up super evenly all over as well, which is always a plus :-P 

It looks so nice on my arms and hands though, so natural looking! It has faded super evenly on my arms and hands thus far ;-) 

Day 5
It's faded quite evenly on the majority of my body, everywhere minus the ankles to be exact :-P it's faded to a tiny hint of a colour all over now. 

Day 6
This tan claims to last 7 days and yeah, there is still tan on me at this point but it's such a slight hint of colour that I wouldn't exactly be saying its a tan :-P 

Day 7
Scrubbing time! I used my Soap & Glory Breakfast Scrub in the shower to scrub the last of the tan away. I was left with some pesky patches on my ankles but apart from that the tan scrubbed away nicely :-) 

Aaaaand I'm back to my pasty self again :-P


Would I recommend?
After each shower it faded more and more so I'd say it lasted about 3 showers before it really started to disappear. 

It faded quite evenly. You definitely want to give your knees and elbows an extra scrub in the shower though so that they don't show up darker! 

I would definitely recommend this tan for someone who wants their colour to last them a couple of days. Since its not an instant tan it's definitely not great for a last minute colour but if you're applying the night before then you're good to go :-)


So guys I hope you enjoyed this tan review! Let me know if there are any self tanners out there that you would like me to try out and review for you guys :-) 
Also, let me know what your holy grail tan is in the comments below :-) 

Love & Hugs, Lora xo 
Read More »

Wednesday, 13 January 2016

Gimme Brow Dupe?

I've recently fallen in love with the Benefit's Gimme brow. It's a coloured brow gel that contains tiny little fibres that help to thicken your brows!


It has a really teeny tiny brush that's the perfect size for your brows. I love it for a more natural every day brow look, or you can also add it over top your usual brow routine to set them in place while adding a little something something ;-) 

BUT. And that's a big but :-P it costs €20 at my local Debenhams counter and that's not a bad price right? HOWEVER, (and that's a big however :-P) why spend €20 when you can spend €3 on virtually the same product? 

I was checking out the Essence stand in Penneys when I noticed a little product called 'Make Me Brow' ....pretty lame name but come on, tell me it's not a total dupe? I mean look at the packaging side by side, it's a dupe I tell you :-P 


So I decided to purchase this bad boy and test it out to see if it is a true dupe. 

I have the medium/dark shade in the Benefit Gimme Brow so I went for the dark shade in the Essence Make Me Brow. Both of these products only come in 2 shades; a light and a dark! 

The Brushes
Here are the brushes side by side....

 
Pretty similar if you ask me. The Essence Make Me Brow brush is just a tiny bit longer, but still small enough for a little brow area :-)  

The Product
So let's check out the actual product. Here is a swatch of both side by side....

     L: Make Me Brow. R: Gimme Brow

The consistency is pretty similar, although the Benefit Gimme Brow feels a little bit more liquidy. 

It's also worth mentioning that the Benefit Gimme Brow has 0.1oz of product whereas the Essence Make Me Brow has 0.12oz! 

The Colour 
The Essence Make Me Brow is also notably darker in colour, it looks quite black in comparison. My brows are pretty dark though so keep that in mind also :-P 

The Test
Here is a picture of the Essence Make Me Brow on my left brow....


And here is the Benefit Gimme Brow on my right brow...

They are literally identical on the brows! I also put these to the test to see how they wear throughout the day. 

Here they are after 8 hours of wear....


The Make Me Brow lasted well on the brows, they stayed in place, the only thing I found is that I did smudge it a little at some point in my day from touching it :-P But I mean, it still looks good right!? :-) 


The Gimme Brow held up just that little bit better, with no smudging but I put that one down to user error :-P

As you can see they both lasted pretty well all day if I do say so myself :-P


The Final Verdict!
I definitely think this is a true dupe for the Gimme Brow, and if your tight on the cash at the minute then it's definitely worth giving it a go! 

I actually slightly prefer the Make Me Brow purely for the application alone, since it's less watery and more of a thicker gel consistency it's much easier to get a precise brow application. I tend to mess up under my brow a little when I use the Gimme Brow! 


Have you guys tried either of these products? Let me know what your holy grail brow products are in the comments below :-)


Hope you guys enjoyed this little dupe. If you would like more posts like this then definitely let me know, I'd be happy to oblige ;-) 

Love & Hugs, Lora xo 
Read More »

Monday, 11 January 2016

Makeup Monday: My Mac Lipstick Collection

I've only recently gotten into Mac lipsticks but the obsession is real! It's true what they say, you really do get hooked!!


I currently own 3 Mac lipsticks and 2 lip liners. 

And here they are! 

1️⃣ Velvet Teddy
This is a matte warm brown toned lipstick. It's been my go to shade through Autumn and Winter :-) it lasts really long on the lips and it's very moisturising for a matte lippy :-)


2️⃣ Please Me 
This is a light pink toned matte lipstick. As always, it's long lasting and very moisturising :-)


3️⃣ Blankety
This one is a cool toned nudey grey shade. It's an amplified colour so it's super moisturising and it's got a bit of gloss to it. It's a nice everyday nude shade.


Here are the 3 lipsticks swatched side by side :-) 


4️⃣ Whirl 
This is one of the lip liners I got for Christmas this year. It's one of the Kylie lip colours (apparently) but I LOVE this, it's such a me colour! 😂 it's a brown toned 90s kind of colour. It's matte but moisturising :-P how many times can you say matte and moisturising in the one blog post? ;-) 
ANYWAYS, this colour is also available in a very hard to get your hands on lipstick :-P it's nearly always sold out! 


5️⃣ Soar
Another awesome Kylie colour lip liner! This one is more pink toned but still a matte nude colour. I'm also totally in love with this. It's quite similar to the Whirl liner so you definitely don't need both of these unless your as obsessed with the Kylie lip colour as I am ;-)


Here is Soar and Whirl swatched side by side...


And there you have it! That is my current Mac lipstick and lip liner collection!

I hope you guys enjoyed reading about my Mac Lippy Collection! Let me know what your favourite Mac products are, this girl is obsessed and ready to expand her collection ;-)

Love & Hugs, Lora xo

Read More »

Sunday, 10 January 2016

Skincare Sunday: Tanning Prep!

If you're as into fake tan as me then you'll know the struggles of getting a perfect even tan, with no streaks! For the next couple of Thursday's I'll be doing a 'Tanning Thursday' where I'll be testing out various tans and reviewing them for you right here ;-) 
So I thought it would be appropriate to kick that off with a tanning preparation post!!

Here are the steps I take to ensure the perfect tan every time :-) 

1️⃣ Shave the night before 
If you're prone to getting ugly tan dots in your pores on your legs then it's because you're tanning too soon after shaving. 
Try to shave the night before you tan, it will help with the nasty dots :-P 

If your legs gets prickly after one night and this is totally not an option for you then try applying the tan in downwards strokes to minimise to look of tanned pores!


2️⃣ Exfoliate
It's really important to exfoliate the skin if you want a perfect application. This will also help to remove the last of your old fake tan as well as removing any dry skin and helping with ingrown hairs!

I use the Breakfast Scrub from Soap & Glory, I find it so good at leaving my skin super soft!


3️⃣ Use a makeup brush
What? A makeup brush? Yes. Use a buffing brush with a small amount of moisturiser as well as your tan to apply to dry areas like elbows, knees, ankles and knuckles! Trust me it works :-)

That way you won't have darker patches on those pesky dry areas! 


4️⃣ Tanning mitt 
Use a tanning mitt to apply the tan to the rest of your body. Apply the tan to the mitt and then rub it in circular motions over the body to ensure that you get a smooth even coverage :-) 

Also, wash your mitt after each application and when it gets really dirty you definitely need to invest in a new one!
I use the Imagination ones from Primark that are only €2 :-) 


5️⃣ Moisturise
Depending on what tan your using, sometimes moisturising can help to prolong the tan, like the Coco Brown and the St. Moriz! 

It is also important to keep your skin moisturised between tanning sessions so that your skin is as smooth as it can be :-) 

Don't apply moisturiser just before you tan though because some tans react to the moisturiser and don't apply evenly! 

I tend to use body butter after every shower, I use the Body Shop Argan oil body butter :-) 


So guys I hope you find this helpful and definitely try it out for yourselves if your having trouble with tanning! 
Let me know what your tanning prep tips are in the comments below :-) 

Stay tuned for Tanning Thursday where I will be reviewing the first tan for you guys ;-) 

Love & Hugs, Lora xo


Read More »